
This resource probably exists somewhere, but I didn’t find it in my 10 or 15 minutes of searching, so I typed something up really quick.
Bridging 101
PACK DEFINITION-
“The Pack is the largest group of in bounds and upright Blockers in proximity and containing members from both teams. If no single group of Blockers meets this definition, there is no Pack, even if there are multiple groups of the same size. Proximity is defined as not more than 10 ft (3.05m), as measured from the hips, in front of or behind the nearest Pack Skater.”
(https://rules.wftda.com/02_gameplay.html#engagement-zone-pack)
That means that you’ve got to be within 10 feet* of the nearest blocker to be considered in the pack. *For purposes of this basic explanation.
ENGAGEMENT ZONE –
“The Engagement Zone is the area in which it is legal for Blockers to engage or be engaged. The Engagement Zone extends forward and backward 20 ft (6.10m) from the foremost and rearmost Pack Skaters, respectively. Any Blocker outside of the Engagement Zone is out of play and cannot engage or be engaged. Blockers who are outside of the Engagement Zone will be warned, and will be penalized if they do not immediately attempt to return to the Engagement Zone. Blockers ahead of the Engagement Zone are only compelled to skate clockwise to return to the Engagement Zone if the Pack is stopped or moving clockwise. Skaters who are illegally blocked while out of play may legally counter-block.”
Bridging is all about keeping your teammates in play so they can block for the maximum length of the track.
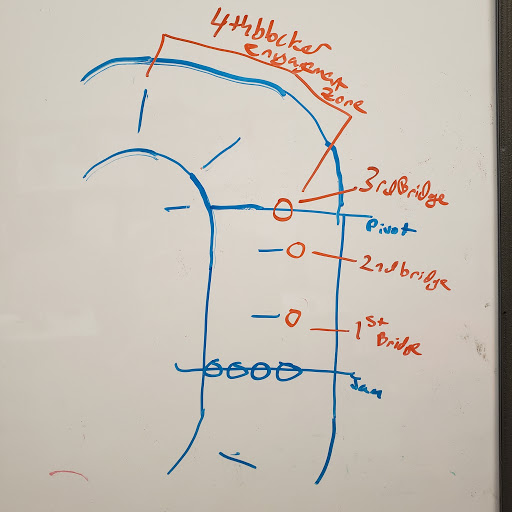
SCENARIO ONE – BRIDGING FORWARD 1,1,2

So if we look at the scenario above, the blue circles are blockers from the opposing team lined up on the jam line.
The orange blockers, if they were bridging out to block a blue jammer, would need one bridge at the first hash mark – 10 feet
Then they’d need a second blocker at the second hash mark – 10 feet away from first bridge.
Then that leaves orange blockers three and four to block for a total of 20 feet more after that second bridge. Once they reach that first hash mark in the turn, they’d need to let the jammer go and go back and regroup.
This first scenario is the one we’ll most likely use the most: 1,1,2 forward bridging.
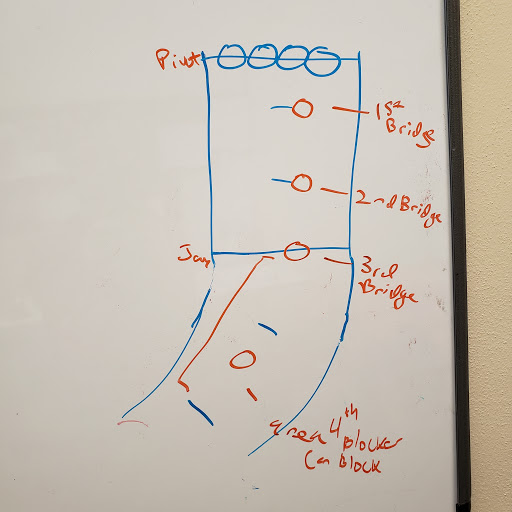
SECOND SCENARIO: BRIDGING FORWARD 1,1,1,1
You can see, it’s the same as the first scenario, only this time we’ve used the 3rd orange bridge out to allow a 4th orange blocker to try and block the jammer 20 feet out. (We don’t often encourage this one because one-on-one blocking is exponentially harder than two-on-one blocking.)
WHAT YOU SHOULD DO IF YOU’RE BRIDGING:
-Communicate!
It’s every blockers’ responsibility to watch out for bridging. You should talk about what lane the jammer is in. And also tell your teammates if they need to bridge or if you’re bridging. Communicate, communicate.
-Become part of the bridge if you’re not actively blocking the jammer.
Don’t stop blocking to become bridge one, for example. If you are able to bridge because you’re not actively blocking the jammer, announce that you are bridging: “I got bridge one! I’m bridge one!” , “I’m bridge two. I got two!” etc.
-Once you are part of the bridge, communicate to your blockers when they need to drop one and start bridging.
The time to do this is generally at 8 feet because derby is loud and reaction times are slow.
“I need bridge two now!” – If you are bridging actively, you might have to call your teammate by name if they don’t respond because they’re busy blocking the jammer. This is all about communication and awareness. Be loud!
-Do not ONLY look forward (or backward, if you’re bridging backwards).
You need to be aware of the track. Look forward. Look backward. The opposing blockers might move up, in which case, hooray! Your bridge just got longer. You can move up to 10 feet away from them. Or the opposing blockers might be coming in for a sweep on you- bad news. If you get knocked down or out, you’re no longer part of the bridge. Be aware. Avoid hits. Move if the opposing pack moves.
-Turn yourself sideways, and get roughly in line with your other bridging teammates.
This is easier for refs to see, and easier for your teammates to see.
-When you’re bridging, keep communicating with the blockers who are blocking.
Helpful things to say: “You’re good! You’ve got (X amount) of feet to go!” And KEEP SAYING THINGS. The blockers blocking are counting on you to hold them in play. And they’re counting on you to let them know when they need to let the jammer go because they’re at that 20 feet out.
-Get together quickly!
If that jammer got out despite your best efforts, don’t bemoan it on the track. Get back together as fast as possible. Here again you’ll need to communicate. Good things to say: “ON ME! REFORM ON ME!” “JAMMER IS COMING UP!” “DROP!” etc.
SCENARIO 3: BRIDGING BACK 1,1,2
Same as the first scenario, just backwards. Same rules apply. This is often used when we’ve hit a jammer out, and we’re drawing them back. Blue circles are the opposing team. Orange team is bridging backwards. First bridge is at 10 feet, second is 10 feet after the first bridge, and blockers 3 and 4 can go up to 20 feet beyond that second bridge.
SCENARIO 4: BRIDGING BACK 1,1,1,1

Same as the 2nd scenario, just backwards. This happens a lot when you’ve got a seasoned player drawing a jammer back. Communicate and try to line up so that when you reform, you’re in the best place possible to block that jammer.
Blue circles are the opposing team. Orange team is bridging all the way back. First bridge at 10, second bridge 10 feet after first bridge, third bridge 10 feet after 2nd bridge, and 4 blocker has up to 20 feet past the third bridge to block.
ADVANCED:
Knock that jammer out and draw them back, reform, and repeat one of your bridging scenarios above.
